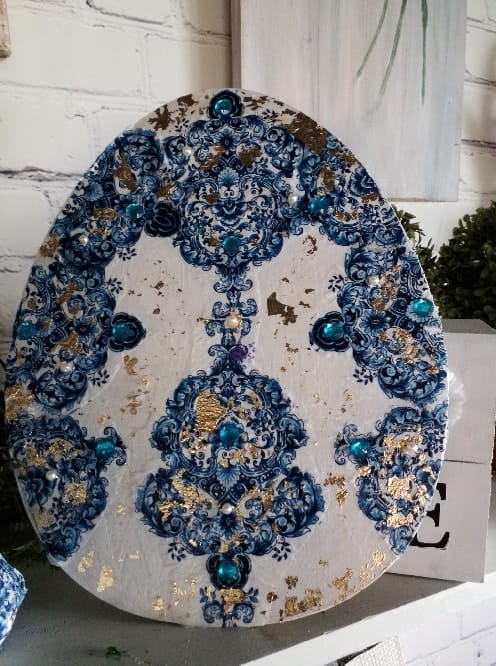
Faberge-Inspired Decoupage Egg
Having been inspired by Faberge for many years, this Faberge-inspired Dollar Tree Decoupage egg was the closest I was ever going to get to owning one. I love details, colors, jewels, and pearls so I put them all together using a Dollar Tree egg. Faberge, in my eyes, is a brilliant designer so he inspires me. I challenged myself to create a beautiful egg, hopefully, I can inspire you too.
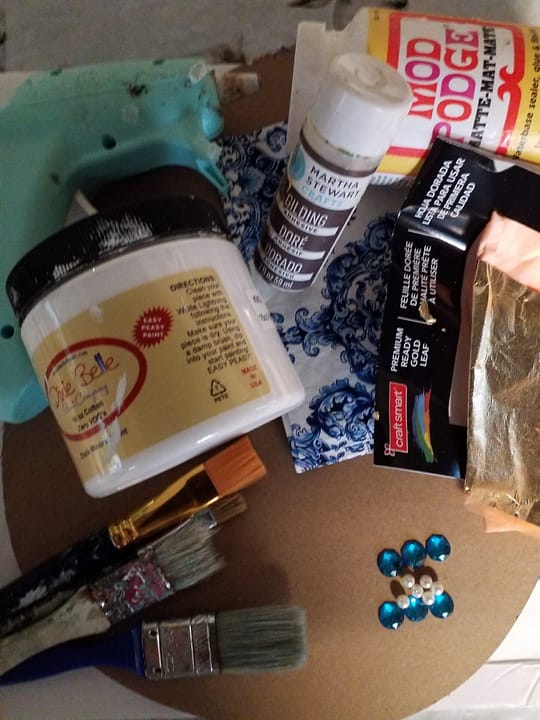
Faberge-Inspired Egg Supply List
- Dollar Tree Egg or Wood Egg Cut Out
- Napkins
- Mod Podge
- Faux Pearls
- Faux Jewels
- Gold Leaf
- Gold Leaf Adhesive
- Dixie Belle Paint Company Cotton
- Glue Gun
- Glue Sticks
- Inch Chip Brush
- Two Inch Chip Brush
- Small Artist Brush
- Small Scissors
*This post contains affiliate links. Using these links will not affect the cost of the product, but I do earn a very small percentage when you use my link. This helps me to keep bringing you great products, tutorials, recipes, crafts, and more! I only represent or recommend products that I believe in and use personally *
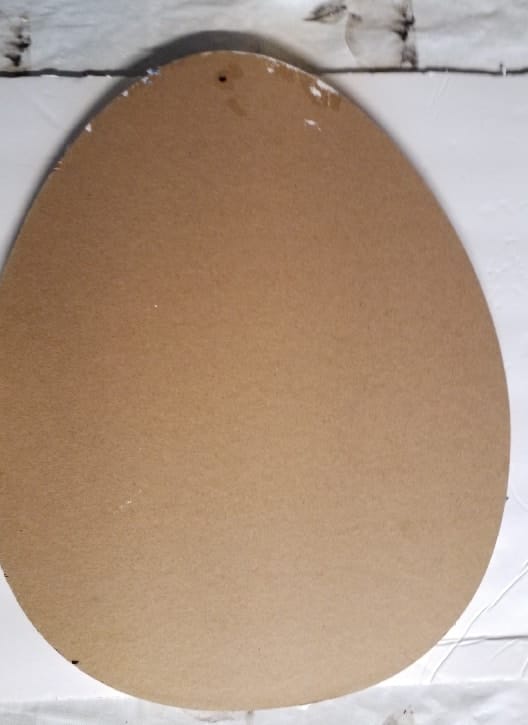
Egg Inspiration At The Dollar Tree
While at my local Dollar Tree, I came across this large egg sign, being a creative person I knew coming up with an idea to upcycle it wouldn’t be too hard. My first thought was a decoupage egg since I have so many beautiful napkins at home. My next thought was Faberge. So I grabbed some jewels and pearls too. After all, you gotta have some bling. Who else gets inspired at a Dollar Tree? I love to craft and create home decor on a budget and was looking forward to seeing where this idea was going.
The Perfect Faberge Style Egg Napkins
Once I got home I couldn’t wait to start crafting. Searching the decorative napkin pile that I keep for decoupaging, I came up with the perfect pattern for my decoupage egg. A gorgeous french country print with a beautiful royal blue. The napkin I choose was two-ply. You have to separate the plies by removing the back of the napkin. It is easier to decoupage with thinner paper. I couldn’t wait to begin designing my decoupage egg.

Picking The Background Paint
Wanting this decoupage egg to have the perfect base coat I choose Dixie Belle Paint Company color Cotton. A pure white color that was a perfect neutral and would go well with the royal blue pattern. I flipped the worded side down because it would be easier to paint. I was applying a coat of paint using a small artist’s brush to the egg and allowed it to dry for about twenty to thirty minutes before applying another coat. I was going for a more solid look because I wanted the pearls and jewels to stand out. This decoupage egg was coming together.

Designing My Decoupage Egg
Once the napkin was separated, I began to cut the pattern out using a small pair of scissors. Next was the fun part, designing my decoupage egg. Placing the cut-out napkin patterns on the egg, I made a design that made me happy. After all, this decoupage egg was going to be fabulous and Faberge-inspired. Once I was happy with the design I began to decoupage using mod podge and a one-inch chip brush. I used the matte mod podge to glue the napkins in place. Allowing to dry overnight. Once dried I applied a second coat of the mod podge and allowed it to dry thoroughly.

Applying Gold Leaf
Once my decoupage egg was completely dry I couldn’t wait to add all the decorations that would really make my egg stand out. I knew pearls and jewels were a must but I wanted to give this decoupage egg a little more. Thinking how beautiful some of Faberge’s designs were I decided to add some gold leaf. I used a gliding adhesive which I apply with a small artist’s brush in the areas I wanted the gold leaf to stick to. Allowing the gliding adhesive to tack up slightly so using the gold leaf would be easier. Gold leaf comes in sheets so I cut sheets of gold leaf into small squares about the size of a quarter. Dabbing them onto the gliding adhesive to achieve the look I was going for. Once happy with the results I allowed the gold leaf to dry completely. The drying time was about thirty minutes. I then took a two-inch chip brush and brushed away any loose gold leaf flakes. Gold leaf can be messy but the mess is worth the trouble.

Decorating Begins
I love adding extra details. To me, it adds such a personal touch. I chose pearls and some blue jewels. Both complement each other and work well with the pattern on the egg. The gold leaf helped bring out the rich color of the blue in the decoupage egg. Heating my glue gun, I was looking forward to seeing what the jewels would add to the decoupage egg. Faberge is known for his fine details and added touches. I was hoping my decoupage egg would be half as impressive. After all, I was working with what I had available.

Final Touches
Once the glue gun was hot I began placing the blue jewels in the areas I thought would enhance this decoupage egg. Once satisfied I glued them in place with a small dot of hot glue. The blue jewels added so much detail and sparkle. Such a big difference from when I first started this decoupage egg. It was shaping up to be more than I thought it could be. I thought adding pearls would give it the richness and texture it needed. I placed each pearl where I thought it would accent the design the most using a small dab of hot glue and held it in place to allow the glue to dry. To my amazement, it looked perfect. I fell in love with my decoupage egg instantly and hope you did too.

Joanie Miller says
This egg is very pretty!
Charlene Jay says
Beautiful, you do such wonderful projects.