Faux Whipped Cream Made Easy

Faux whipped cream, who would’ve thought it was possible? Well, it is and it’s very easy! After I painted my mugs were painted to update my coffee bar, I thought something was missing. They needed something more but what? While scrolling on Facebook, I came across a picture of an adorable mug with whipped cream. It was real whipped cream, mind you. It looked so adorable and was exactly the look I wanted, but how do you make faux whipped cream?
This post contains affiliate links. Using these links will not affect the cost of the product, but I do earn a very small percentage when you use my link. This helps me to keep bringing you great products, tutorials, recipes, crafts, and more! I only represent or recommend products that I believe in and use personally.
(faux whipped cream easily made)
Supply List
- Dap lightweight spackling compound
- Paint color of your choice, I used Dixie Belle Soft Pink
- container
- spoon
- icing bag, or pastry bag
- tip for icing
- coupling
- wax paper
- cardboard
- glitter
- scissors
- decorations
- tape
- Mason jar
Trying To Make It Work
Decorating and creating are two of my passions. Everyone wants a gorgeous home, right? Budget-friendly decors are what everyone likes to have. I wanted to create faux whipped cream for my updated mugs. But how could I? I’ve never done this before. Wanting and doing are two different things, right? I use many different mediums when creating. Being a DIYer, you get used to using things on hand. I wanted something budget-friendly. I decided on giving Dab joint compound a try. This product is good for creating raised stencils on furniture. It dries rock hard and the consistency is perfect for piping.
Trial and Error
Having Dab on hand, I decided to give it a try. Dab featherweight was the perfect consistency to try and do what I was planning. Its lightweight texture was similar to icing and I was hoping it would easily work. Grabbing a small plastic container, I scooped some up. My mug was Soft Pink so I wanted my faux whipped cream to match. Adding a teaspoon of Dixie Belle Soft Pink color, I began mixing and hoped it would take the color nicely. To my surprise, it worked perfectly. The consistency looked like fluffy icing! Being happy with the results, I moved on to the next step not really knowing if this was going to work.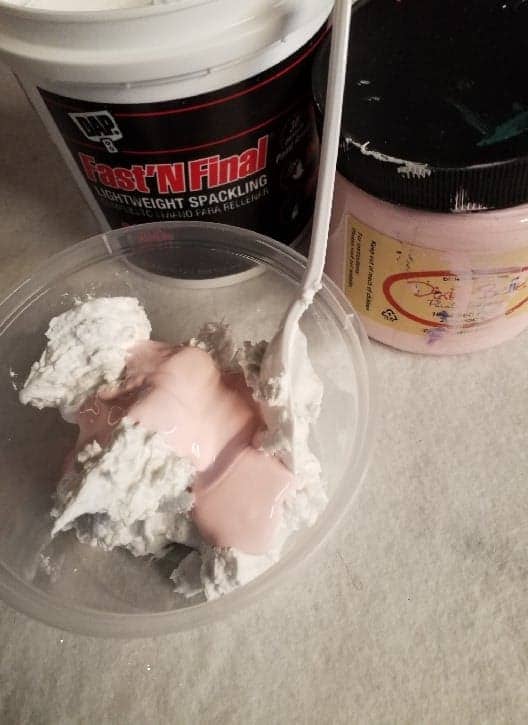
Messy Situation
Grabbing my pastry bag, a coupler, and icing tip number 32, I snipped off the icing bag tip slightly, pushing the pastry tip to the bottom to get a tight fit. Next, I placed the pastry coupler in, screwing it on for a secure fit. Then, I tried scooping the mixture into the bag which was a messy situation. I needed three hands, which I didn’t have. So, I decided to try a mason jar. Placing the bag over the top and the tip in the center, it worked like a charm! I filled the bag with the mixture, making sure not to overfill and only to the line. Removing the bag with the mixture, I began twisting the top trying to remove any air bubbles that might cause a problem later. So this is a great tip when filling an icing bag.
More Trial and Error
The bag had been filled, so I needed to create something that would sit on top of my mug so it would be easy enough to remove in case I decided to redecorate. I had some scrap foam board so I decided to give it a try. Once I turned the mug upside down, I traced the opening with a pencil. Then, I cut the circle out with a pair of scissors and placed it on top of the mug to see if it was a good fit. It worked perfectly. Finally, my idea was coming together or so I thought.
Grabbing my icing bag, I excitedly began piping the mixture. It began sliding around and I couldn’t get it to work properly. Sometimes with DIY’s, it’s all about trial and error until you figure it out. I grabbed cardboard and wax paper, wrapping the wax paper around the cardboard then taping it to the cardboard. I then taped the foamboard to the wax paper so I could stop it from moving around. To my surprise, it worked.

Coming Together
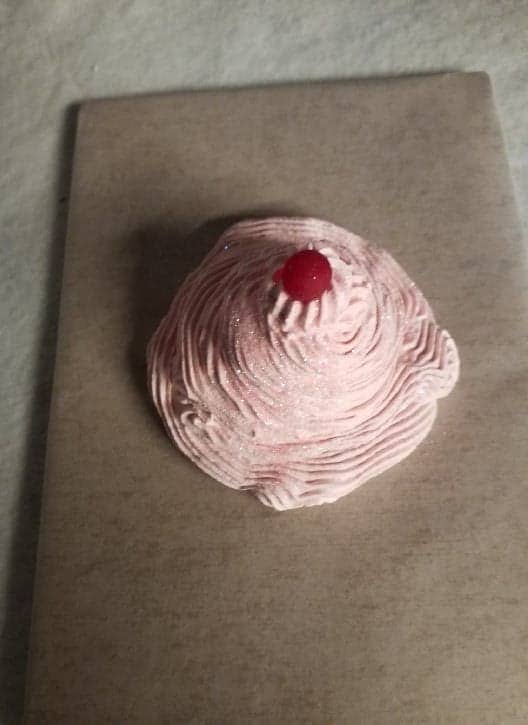
Now that things were hopefully going in the right direction, I was excited to see if all this effort was going to pay off. Placing a large drop of the mixture in the center, I began working my way out to the ends. I didn’t want to show the unevenness of my edges so, I continued upwards in a circular motion. Wanting this to look like real whipped cream, I created layers working my way up to the top getting smaller and smaller as I went. The mixture was a perfect consistency and was creating the look I wanted. I had my faux whipped cream. Now to decorate while it was soft.
I wanted a boutique fabulous look so I added some pink extra fine glitter. Wanting a cherry on top and not having any, I had small faux grapes on hand. Removing one grape, I placed it on top. I was amazed that it had worked. After all of the trials and errors, it finally came together. I was delighted! It had a beautiful, glamorous, boutique look. The glitter had given it a slightly sparkly look and the “cherry” made it look real. It took forty-eight hours to completely dry. I tested in-between time, but it was a little soft. Then I allowed it to completely dry before placing it on top of my mug. Faux whipped cream had been created. The decorations were the perfect added touch, but you can do this with any decorations of your choice and any color you prefer.
What do you think of my faux whipped cream? Would you try it? Please leave a comment below and perhaps I will do some more projects with faux whipped cream. 

Sally Blackwell says
I cannot get the spackle mixture to go through the icing tip. I am using a #1M Milton tip.
Toinette Brown says
I’m having the same issue. I added water and that has helped. Did you find a solution?
Erin Eppler says
I use a wet?damp cloth or baby wipes