Fall Is Here!
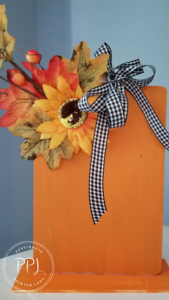
I have been crafting and creating for the fall season and I thought of a new pumpkin craft to create. I decided I would make a wooden pumpkin sitter! Now, I knew this would craft would be easy so I figured it was perfect for crafters who don’t have a lot of time on their hands. I love thinking of cheap, fun, and easy crafts that can fit any lifestyle. A wooden pumpkin sitter would give a fall feel, but you can decorate the bottom space however you want. You can place small skeletons around the bottom, family photos around the bottom, and so much more! Crafting is a time to bring out your creative side and think outside the box.
This post contains affiliate links. Using these links will not affect the cost of the product, but I do earn a very small percentage when you use my link. This helps me to keep bringing you great products, tutorials, recipes, crafts, and more! I only represent or recommend products that I believe in and use personally.
Supply List:
- cutting board
- fall floral pick
- wood plank
- buffalo check ribbon
- stick
- hot glue sticks
- hot glue gun
- Apple Barrel Acrylic Paint Jack-O-Lantern
- artist brush
- wire
- wire cutters
- scissors

Getting Started
First, I wanted to paint the wood plank and the cutting board so that way they could have time to dry while I worked on the rest of the project. I used Apple Barrel Acrylic Paint Jack-O-Lantern for the color of my wooden pumpkin sitter. Using my artist brush, I painted the first coat and then waited for the paint to dry completely. Once the first coat dried, I painted a second coat because I thought the first coat was still too sheer. I set them aside to wait for the paint to dry.

While the second coat of paint was drying, I went out to my backyard to find a nice, thick stick on top of my wooden pumpkin sitter. Once I found the perfect stick, I broke it down to a very short length and then took it inside to use as a stem. I then measured out a long piece of buffalo check pattern to set to the side for a bow that I would later make. My hot glue gun had been heating up, so I could hot glue the cutting board onto the wood plank. I laid the wood plank down and put a thick line of hot glue down the center before placing the cutting board on top. You want to hold the cutting board in place until the hot glue completely dries. Once it is dry, you can glue the seams if you want to be sure it doesn’t fall. It should hold in its place if the glue was able to dry properly.

Small Decorations For A Fall Decoration
Next, I took the stick from my backyard and put a dab of hot glue on the top of the cutting board in the middle. I held the stick in place until the glue was completely dry. After that, I hot glued the fall floral pick to the cutting board to add a small fall touch.

Now, it’s time for me to make a cute bow. I used the buffalo check pattern to make a simple bow to add to our decorations on top. I did my absolute best to layer the bow and make it look nice and big, however, I am not a bow maker. The wire certainly came in handy with helping my bow stay together. I wrapped the wire around the middle and twisted it to secure the bow before wrapping the wire around the bottom of the stick. This helped the bow remain on top of the wooden pumpkin sitter. I may not create the best bows, but that is why I love crafting. Crafting is much like drawing. You can make whatever you want because it is your craft. I truly believe that you have to love your craft before worrying about whether anyone else likes it or not. It is completely okay if someone doesn’t like a certain craft seeing as it is something that YOU wanted to make and create.

Once I got all of the decorations on my wooden pumpkin sitter, I was feeling truly satisfied with what I had created. It was the perfect fall decoration to add to my collection. This truly was an easier craft to create and have fun with. Please remember to always be careful when using hot or sharp objects!
I hope I was able to inspire you to create from the heart. Please check me out on Facebook, Twitter, Pinterest, and Instagram. This was a fun and easy craft to make. Please check out my other blog posts and have fun crafting!
Farmhouse Pumpkin, A Simple DIY!

