Farmhouse Pumpkin To The Rescue
As you may know, I love to create. I get inspired by the things I see around me. I love creating unique and beautiful decor for my home. Like most, I love fall and all of the beautiful colors the season brings with it. I also love farmhouse home decor. I LOVE PUMPKINS! I enjoy changing my scenery with the seasons, constantly looking for new and different ways to update my decor. Dollar Tree offers many affordable items. It’s such a great place to look for ideas. I cruised the dollar store a few days ago and noticed they had their fall decor out. As I said, I love fall because it is such a colorful time of year. Then, it came to me. Farmhouse Pumpkin!

Supply List
- Glue Gun
- Glue Sticks
- Dollar Store pumpkin wooden cutout
- Paper towel
- Dixie Belle’s Coffee Bean
- Metallics wax (color choice)
- 3-inch chip brush
- 2-inch chip brush
- Silicon molds (choice)
- Dixie Belle’s Florida Orange
- Two small artist paint brushes
- Dixie Belle’s Fluff
- Buffalo Check 3-inch Ribbon
- Dollar Tree Pumpkin Ribbon small
- Wire
- Pliers
This post contains affiliate links. Purchasing through these links does not change your cost for these great products! I get a tiny percentage when you buy, which helps me keep bringing you fabulous projects.
I Found My Inspiration For My Farmhouse Pumpkin
I knew I needed something that would sit on a shelf. It had to have color and texture. Dollar Tree has a lot to offer, so my mind was overdrive! I snagged up two wooden pumpkin cutouts. I figured I could make them work for a farmhouse pumpkin. In my mind, I was already dreaming up my farmhouse pumpkin! I wanted to add buffalo check. After all, buffalo check screams farmhouse! I had floral glue gun molds leftover from another project sitting at home. They would certainly give me the texture I wanted. So, I challenged myself to see what I could come up with next!

I had Dixie Belle Paint Company’s Florida Orange in my paint stash, which is the perfect color for the pumpkin and molds. When I returned home, I went straight for the molds to see how many I had. I couldn’t wait to see how it turned out! Placing my molds on the pumpkin, I heated my glue gun. I put a small dab of hot glue on the reverse side of each mold, pressing them down firmly with my fingers to ensure they were secure. Once they were secure, I used a three-inch chip brush to paint the pumpkin orange. I chose Florida Orange because it’s lush and the perfect color for my farmhouse pumpkin. You might have to dab a bit in between because of the mold’s texture to ensure you get in between all the raised areas. Then allow it to dry for approximately fifteen minutes.

It’s All About The Details
My farmhouse pumpkin still needed extra dimension because the molds are so detailed and pretty. I decided to dry brush some white paint onto my farmhouse pumpkin. I dipped ever so slightly with a two-inch chip brush into my Dixie Belle’s Fluff. I then wiped most of the paint off with a paper towel. With the color that remained on the brush, I brushed over all of the raised details, barely touching the molds. You can always add more paint if you want a little more of a dramatic effect. The outcome was surprising! It looked farmhouse chic and textured.

I created a leaf with a more extensive mold. You can cut your mold with scissors to make it fit perfectly. Then with a small artist brush, I dipped into green paint to paint the stem area. I let the green dry entirely while I cleaned my brush in some water.

Next, using Dixie Belle’s Coffee Bean, I brushed the stem and wiped it right back off with a paper towel to let the wood grain show through. After all, pumpkins have a woody stem. After the stem was dry, I glued the leaf down securely, pressing it down firmly to get a snug fit.
I was happy with the results so far, but it still needed a little something extra. So I decided on a metallic copper wax to highlight the raised areas. I gently dipped only my fingertips into the wax. I rubbed the metallic wax over the molds, applying it here and there until I was satisfied. Wow, was I surprised how nice this pumpkin was shaping up!

Tying My Farmhouse Pumpkin Off With A Bow
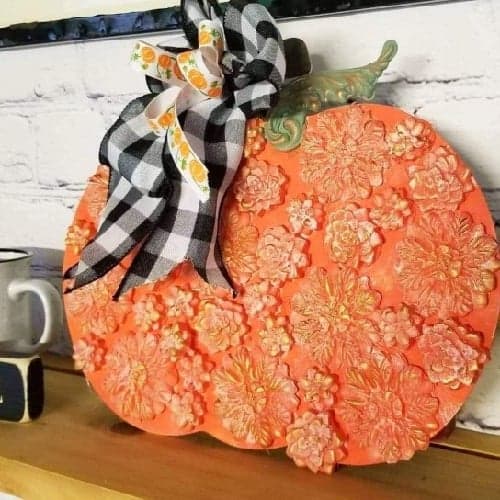
To finish the farmhouse look, I chose a buffalo check ribbon; this tied the look together nicely! Who doesn’t like buffalo check?
I tied a bow and wrapped wire around it, making sure there was extra wire because I knew I needed to tie it onto the stem. It’s easier to secure when you have a little additional material. I added a smaller bow with a pumpkin pattern, just for a pop of color. I wrapped that with wire, too, making sure I was allowing for extra to tie it.
Now I needed to tie both ribbons together with the wire I used to make the bows. Leave the extra wire on the underside. I fluffed out the bows a little bit to get the look I wanted, then twisted the bow securely onto the stem. I then cut the excess wire off using a pair of wire cutters. Next, I tucked the sharp ends under, ensuring they wouldn’t show and no one would get hurt if they handled the pumpkin.

The result is stunning! I created the farmhouse pumpkin I envisioned! What do you think?
Please comment below. I would love to hear your thoughts. Is it unique? Please feel free to contact me with any questions or suggestions. I would love to hear from you. Also, feel free to follow me on Pinterest, Facebook, Tiktok, or Instagram!
If you enjoyed this post, you might also like:

Kathy Marie says
Love it Annie 💙
paintedlady says
thank you so much
Pat Wear says
Oh my, oh my that is so pretty. Love watching you craft and seeing your creativity come alive in front of us! No doubt in my mind you are most amazing Annie!!!
Erin Eppler says
Thank you, Pat, amazing IDK about that, I just can be me. Thank you so much for all your kindness, love and support XOXO Annie